


July 31, 2012
Hammock Pack
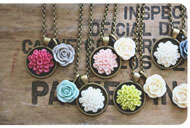
July 30, 2012
Coming Soon!


Lots of new colors and flowers coming to the shop in the next few weeks. Already debuted the new double flower necklace at a show Saturday and sold 3 of the 5. So I'm making more right now. Color combinations are going to be limited edition and change with the release of each new collection.


July 27, 2012
r&s // june - july 2012

he moved down to flight school
she was working down at the gulf
she came home for a wedding
he came home to see about a girl
she woke up early for a race
he surprised her and brought bananas
they began dating

she took a two month rotation from work
he invited her to spend 4th of July with him
she couldn't say yes fast enough
they didn't get tired of each other all week
they spent lots of time in a hammock
he studied a ton for flight school
she made some pretty big investments
they sold her jewelry at several farmer's markets
July 23, 2012
these days.
a lot of the same going on around here. loving the farmer's markets shows, two more this week!


July 19, 2012
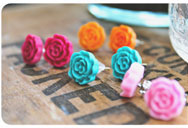
Ring Display // DIY

After last weekend's show, I knew I needed a better way to display my rings. I had a few ideas bouncing around in my head and then I just decided to try something and work from there. I roamed around my local store and found a wooden spice rack ($6), a 1/2" wooden dowel ($.87) and a can of ivory spray paint ($4). I really had no idea exactly how I was going to execute the project, but here is how it unfolded.


1 // I sanded the wooden spice rack down with medium grade sandpaper. 2 // I placed a few of my rings on the dowel to see where I wanted to make my cuts. 3 // Cut the dowel down into three 3" lengths. I used a hand saw and struggled a lot, wishing I was back at home to use the electric. 4 // Since my lengths were kinda uneven I played around with the best way to situate them and then made marks. 5 // I used a glue gun to attached the dowels to the wooden spice rack. **Honestly, at this point I thought I had failed, it wasn't too pretty. 6 // Two coats of spray paint. Love this brand. Allowed it to dry for 24 hours.

AND TADA!! An very inexpensive ring display for my next show. I'm thinking of mixing in some earrings as well so it isn't too overwhelming.
Okay opinions? Comments? Any better ideas? I'd love to hear them!
July 18, 2012
Indie & Chic's 3 year Birthday Bash & 24hr SALE!

Hard to believe Indie & Chic got it's start 3 years ago. To celebrate the entire shop is 30% off. Just use code BDAY3 and it will be taken off. All orders over $30 will get free shipping using code BDAYSHIP. **If you qualify for free shipping but want to use the 30% off coupon, just use the BDAY3 and I will refund your shipping costs via paypal.**
24hr sale ends at midnight (central time)
Kara over at IJME is hosting a Birthday Bash giveaway. There is a $30 gift certificate up for grabs over there. So hop on over.
July 17, 2012
Indie & Chic in the Market
The shop really stepped out on a ledge this weekend, well actually I did. Saturday morning I setup a table at my town's Farmer's Market. I was pretty nervous and intimidated, but I just took a deep breath and did it.

Things that didn't work//
- Wind. The wind was crazy and I had not thought about my table in terms of wind. My price cards kept flying off and at one point my shelving unit went airborne. Back to the drawing board on how to communicate prices.
- My people skills. My boyfriend sat with me at the table and after the first few people looked at my line he nicely told me that I was extremely awkward. (I've known this for years). I have a very hard time talking about my work and I don't want to annoy people that are browsing. However, I've decided to come up with a few sentences that engage a browser so that I don't come across as an uncomfortable artist.
- Ring displays. I don't think people see my rings in the shelving unit and then they get lost on the table. I've already bought supplies to begin construction on an idea for better display. More on that once I fail or succeed on that DIY.
Things that worked //
- My table setup. The new table design flowed well. There are many things I'd still like to improve to bring people over to my table. People seemed to want to pick items up and ask questions about them. And my banner is still a slam dunk!
- People love the product. I was told over and over how unique my line was (BINGO!). That alone made me feel like I was headed in the right direction. Just need to figure out a way to make it impossible to walk away without a purchase.


Saturday afternoon and all day Sunday I was at the Atlanta Market. It's basically where retailers all go to find new products to sell in their stores. I tagged along with my mom to help her shop for her monogram store. While I was there I began finding lines and product that fit with Indie & Chic's concept. I made a decision right then to expand Indie & Chic in 2013 to more than just my own handmade items. I picked up an amazing new clothing line, some household items and of course bags. Still have 5 more months to search for more product to introduce in the new year. I'm extremely nervous, kinda feel crazy, but I'm also smiling as I type this. Indie & Chic is a huge part of who I am, and I want to take the next step.
**Tomorrow we are celebrating Indie & Chic's three years with a big 24 hour sale. I promise it is worth your time**
July 12, 2012
these feet.

These feet hit the ground running in 2012. Running one race a month. Working down in the gulf. Hikes at the State Park. Spin classes at the gym. A killer bachelorette weekend that was topped by the wedding. I've loved 2012 so far, it's been good to me.
Well in June these feet, met these feet. Now these two cannot get enough of each other. The feet belong to a guy named Rob. He has become my best friend and my boyfriend. The beginning of r+s and many more feet photos.

July 11, 2012
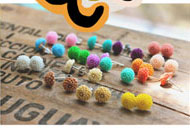
New Mini Mum Colors
Long overdue. Every color of the rainbow. Still one of my favorite earrings two years after their debut.


 All of these can now be found in my shop, blues & greens, pinks & purples, neutrals, and yellows.
July 10, 2012
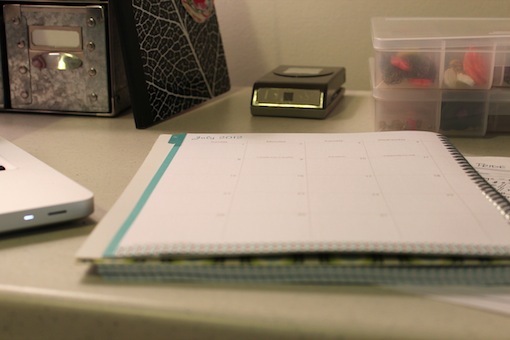
Summer Studio // Step One
My summer "studio" is located in one corner of my room. I'm going to post updates as it comes together! Today I brought up an old work table we've had and attempted to cover it with masking tape... before running out. I love the look of it though. I can work standing now which is AMAZING. I also get to display a lot of my storage instead of it always being boxed up. So here's week one, messy but has potential.


SO happy with my new workspace. Very inspiring to have a permanent setup for the next 2.5 months. Cannot wait to see what new designs get dreamed up in this space. FYI, the chevron storage boxes are from Target, the bowls are from Anthropologie and the metal drawers were found at TJMaxx.
July 9, 2012
If You See A PINK Cow say MOO!


July 6, 2012
these days.


July 5, 2012
Sharpie Mugs // Pinterest Project


The boyfriend and I wrote messages on each others mugs with a regular sharpie. It was very easy to write on the porcelain. We placed them on a cookie sheet in the oven (350) for about 45 minutes. Then we let them cool and didn't mess with them for about 24 hours. This morning I was pretty nervous to wash them, but they did great. Nothing came off and now I'm drinking a homemade chai tea latte out of mine.


Subscribe to:
Posts (Atom)